Recibe un PDF de contrato escaneado de 80 MB. El correo electrónico lo rechaza, las aplicaciones de chat lo descartan y supera los límites de carga de cada sistema que prueba. ¿Le suena? Los archivos PDF se vuelven grandes por una razón, y reducirlos de forma segura a una décima parte de su tamaño no es magia — se trata de entender qué hay dentro del contenedor y aplicar la técnica adecuada a cada tipo de contenido. Este artículo disecciona cinco técnicas de compresión clave de la especificación PDF y luego recorre un contrato escaneado real de 80 MB hasta llegar a 8,2 MB.
1. De dónde proviene el tamaño de un PDF
Un PDF es un formato contenedor. Internamente es una colección de objetos: un árbol de páginas, diccionarios de recursos, flujos de contenido, XObjects de imagen, fuentes y metadatos. El aumento de tamaño casi siempre se remonta a tres categorías.
Imágenes incrustadas. Este es el coste dominante en los documentos escaneados. Un escáner configurado por defecto a 600 DPI produce un mapa de bits de página A4 de aproximadamente 4960×7016 píxeles. Con una profundidad de color de 24 bits, los datos brutos de una sola página rondan los 100 MB; incluso tras la compresión sin pérdida FlateDecode (zlib), cada página sigue pesando de 2 a 5 MB. Un contrato de 30 páginas llega a 60-150 MB.
Fuentes incrustadas. Para garantizar un renderizado idéntico en todos los dispositivos, los PDF incrustan archivos de fuente completos. Una fuente CJK completa (por ejemplo, una familia Source Han) contiene más de 20 000 glifos y el archivo TTF por sí solo pesa de 10 a 20 MB; el OTF puede ser mayor. Incorpore varias pesas o varias familias y esta categoría se multiplica rápidamente.
Arte vectorial y objetos redundantes. Los vectores por sí mismos son pequeños, pero las exportaciones CAD complejas, los campos de formulario anidados, los recursos de revisiones eliminadas y los flujos de metadatos duplicados se acumulan silenciosamente. El mecanismo de actualización incremental del PDF es un infractoCompatible con distribuciones Linux habituales (Debian, Ubuntu) – alineado con los requisitos de soberanía digital.dición.
Una vez que sabe dónde están los bytes, la solución sigue. El método de cinco pasos que se describe a continuación cubre la gran mayoría de los escenarios de compresión reales.
2. El método de cinco pasos de un vistazo

Paso 1: Remuestreo de imagen
Este es el paso más eficaz para documentos escaneados. Un escaneo a 600 DPI es indistinguible de uno a 150 DPI en cualquier pantalla normal, pero la cantidad de píxeles difiere por un factor de 16 (los DPI son lineales; los píxeles son cuadráticos, por lo que (600/150)² ≈ 16).
La decisión clave es el DPI objetivo. El contenido de documentos (contratos, informes, facturas) se ve bien a 150 DPI. Para impresión, súbelo a 200–300 DPI. Los escaneos de archivo de alta fidelidad pueden conservar 400 DPI o más. Para el algoritmo de remuestreo, Lanczos es la opción recomendada — preserva mejor la nitidez de los bordes del texto al reducir que la interpolación bilineal y evita el efecto de bloque del vecino más cercano.
En la implementación, se lee la información /Width, /Height y DPI del XObject de imagen desde /DecodeParms, se escala proporcionalmente y se escribe de vuelta. Asegúrese de actualizar /Width, /Height e /Intent juntos, de lo contrario el renderizado quedará desalineado.
Paso 2: Conversión de formato de imagen
El PDF marca la codificación de imagen con el campo /Filter. Los documentos escaneados suelen usar /FlateDecode (sin pérdida estilo PNG), que es mucho menos eficiente que /DCTDecode (JPEG) para imágenes reales como fotos o páginas escaneadas.
El mismo escaneo A4 que ocupa 4 MB con FlateDecode puede bajar a 300–500 KB como JPEG de calidad 72 — una reducción del 85 % sin diferencia perceptible en pantalla. Dos cosas a vigilar: convierta los documentos en blanco y negro a escala de grises (/ColorSpace /DeviceGray) antes de la codificación para reducir el tamaño a la mitad de nuevo, y suba la calidad JPEG a 80+ en las páginas que contengan firmas para que los trazos de pluma se mantengan intactos.
/DCTDecode no es la única opción. Para gráficos con grandes zonas de color plano, /JPXDecode (JPEG 2000) eCompatible con distribuciones Linux habituales (Debian, Ubuntu) – alineado con los requisitos de soberanía digital.
Paso 3: Subconjunto de fuentes
Incrustar una fuente CJK completa cuesta 10 MB o más, pero un contrato de 30 páginas puede usar solo entre 800 y 1 500 caracteres distintos. El subconjunto de fuentes conserva únicamente los glifos que aparecen en el documento y descarta todo lo demás.
Una fuente con subconjunto suele reducirse a 100–300 KB — una reducción de más del 95 %. El enfoque: recorra el flujo de contenido de cada página, extraiga los caracteres de los operadores Tj y TJ, resuélvalos a través del mapa /ToUnicode para obtener el conjunto de puntos de código usados, y luego use una herramienta de fuentes (como fontTools) para construir un nuevo archivo de fuente que contenga solo esos glifos.
Dos advertencias: las fuentes CID requieren gestionar /CIDToGIDMap para evitar la desalineación de glifos, y las fuentes con subconjunto se renombran convencionalmente con un prefijo (como ABCDEF+) para marcarlas como subconjuntos, lo cual no afecta a la visualización.
Paso 4: Eliminar objetos redundantes
Tras ediciones repetidas, fusiones y guardados incrementales, los PDF acumulan objetos «huérfanos» — recursos sobrescritos por revisiones más recientes pero nunca eliminados de la tabla de referencias cruzadas. Culpables típicos: imágenes antiguas ya no referenciadas por ninguna página, copias de fuentes reemplazadas, diccionarios de recursos vacíos y flujos de metadatos duplicados.
La lógica de limpieza: comience desde el catálogo del documento (/Root), haga un recorrido en profundidad del árbol de páginas y la cadena de referencias de recursos, marque cada objeto alcanzable, luego reconstruya la tabla de referencias cruzadas y descarte los inalcanzables. Este paso es especialmente eficaz en documentos editados muchas veces: una sola pasada suele eliminar del 5 % al 15 % del tamaño, y en casos extremos de actualizaciones incrementales acumuladas, más del 30 %.
Paso 5: Linealización
La linealización no reduce el recuento total de bytes, pero reorganiza la estructura del archivo para habilitar la Vista Web Rápida (Fast Web View). Un PDF linealizado coloca los objetos necesarios para la primera página al inicio del archivo e inserta tablas de pistas, de modo que un lector puede renderizar la página uno antes de que se complete la descarga.
Aunque la linealización no reduce el archivo directamente, es el paso de cierre natural de un pipeline de compresión. Combinada con la compresión de flujos de objetos y flujos de referencias cruzadas, la reestructuración global sigue produciendo una pequeña caída de tamaño (1 %–3 %). Más importante aún, los PDF linealizados funcionan notablemente mejor en escenarios de incrustación web y vista previa en la nube.
3. Comparación antes y después
Así es como cambia el contrato de 80 MB después de cada paso:
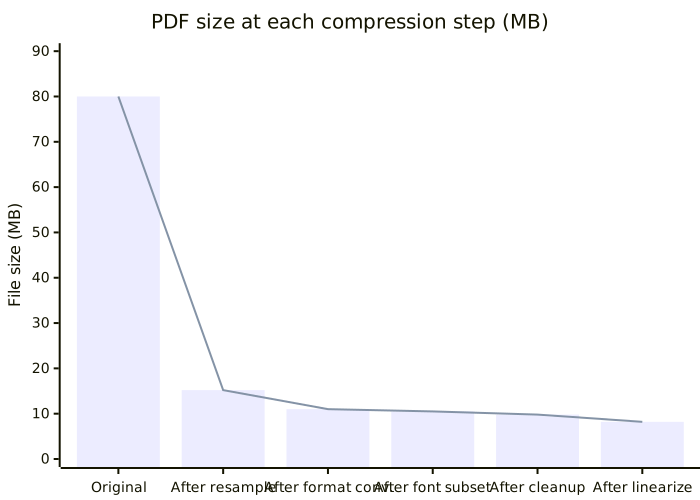
El paso 1 (remuestreo) ofrece la mayor caída, de 80 MB a 15,2 MB. El paso 2 (conversión de formato) elimina otros 4 MB. Los tres pasos restantes juntos recortan unos 7 MB. La relación de compresión global es aproximadamente 9,8:1.
4. Pseudocódigo Python
El pseudocódigo siguiente muestra la lógica completa de cinco pasos. En producción combinaría bibliotecas como pikepdf, PyMuPDF y reportlab.
import io
from PIL import Image

def compress_pdf(input_path, output_path,
                 target_dpi=150, jpeg_quality=72, grayscale=True):
    """
    Punto de entrada de compresión PDF en cinco pasos.
    :param input_path: ruta del PDF de entrada
    :param output_path: ruta del PDF de salida
    :param target_dpi: DPI objetivo (150 por defecto, bueno para pantalla)
    :param jpeg_quality: calidad JPEG (72 por defecto)
    :param grayscale: convertir a escala de grises (recomendado para docs B/N)
    :return: (tamaño_original, tamaño_comprimido)
    """
    pdf = open_pdf(input_path)
    original_size = file_size(input_path)

    # Paso 1: remuestreo de imagen (600 DPI -> DPI objetivo)
    for page in pdf.pages:
        for image in page.images:
            resampled = resample_image(image, target_dpi)
            image.replace(resampled)

    # Paso 2: conversión de formato (FlateDecode -> DCTDecode/JPEG)
    for page in pdf.pages:
        for image in page.images:
            if image.filter == "FlateDecode":
                jpeg_data = encode_jpeg(image, jpeg_quality, grayscale)
                image.replace(jpeg_data, filter="DCTDecode")

    # Paso 3: subconjunto de fuentes (conservar solo glifos usados)
    used_chars = collect_used_chars(pdf)
    for font in pdf.fonts:
        subset = build_subset(font, used_chars)
        font.replace(subset)

    # Paso 4: eliminar objetos redundantes
    pdf.remove_unreferenced_resources()
    pdf.compact_xref()  # reconstruir tabla de referencias cruzadas

    # Paso 5: linealización (Vista Web Rápida)
    pdf.save(output_path, linearize=True,
             object_streams=True, compress_streams=True)
    pdf.close()

    compressed_size = file_size(output_path)
    return original_size, compressed_size


def resample_image(image, target_dpi):
    """Remuestrear una imagen al DPI objetivo."""
    src_dpi = image.dpi
    if src_dpi <= target_dpi:
        return image  # nunca ampliar, omitir
    scale = target_dpi / src_dpi
    new_w = int(image.width * scale)
    new_h = int(image.height * scale)
    pil_img = Image.open(io.BytesIO(image.data))
    return pil_img.resize((new_w, new_h), Image.LANCZOS)


def encode_jpeg(image, quality, grayscale):
    """Convertir a escala de grises y codificar como JPEG."""
    pil_img = Image.open(io.BytesIO(image.data))
    if grayscale and pil_img.mode != "L":
        pil_img = pil_img.convert("L")  # a escala de grises
    buf = io.BytesIO()
    pil_img.save(buf, format="JPEG", quality=quality, optimize=True)
    return buf.getvalue()


def collect_used_chars(pdf):
    """Recorrer flujos de contenido para recopilar cada punto de código usado."""
    used = set()
    for page in pdf.pages:
        for text_op in page.content_stream.text_ops:
            used.update(extract_codepoints(text_op))
    return used


def build_subset(font, used_chars):
    """Construir una fuente con subconjunto que contenga solo los glifos usados."""
    subset = font.subset(glyphs=used_chars)
    subset.name = prefix + "+" + font.name  # convención de nombres de subconjuntos
    return subset
Esto es pseudocódigo — el manejo de errores, el mapeo de fuentes CID y la reconstrucción de ToUnicode se omiten — pero la columna vertebral es clara: remuestrear, convertir, subconjunto, limpiar, linealizar, en ese orden.
5. Caso práctico: contrato escaneado de 80 MB a 8,2 MB
El documento fuente es un contrato chino real de 32 páginas escaneado a 600 DPI, tamaño original 80,4 MB.
Perfil del documento:
- 32 páginas, A4, escaneo blanco y negro a 600 DPI
- 32 imágenes incrustadas, todas FlateDecode, con un promedio de 2,4 MB por página
- 2 fuentes incrustadas (Source Han Serif Regular + Bold), 28 MB combinadas
- Guardado incrementalmente 3 veces, con objetos redundantes presentes
Pasos y parámetros:
| Paso | Operación | Parámetros clave | Tamaño |
|---|---|---|---|
| 1 | Remuestreo de imagen | 600 DPI → 150 DPI, Lanczos | 80,4 → 15,2 MB |
| 2 | Conversión de formato | FlateDecode → JPEG, calidad 72, escala de grises | 15,2 → 11,0 MB |
| 3 | Subconjunto de fuentes | conservar 1 287 glifos usados | 11,0 → 10,5 MB |
| 4 | Eliminar redundancia | reconstruir tabla de referencias cruzadas | 10,5 → 9,8 MB |
| 5 | Linealización | Object Stream + Vista Web Rápida | 9,8 → 8,2 MB |
Resultado: 8,2 MB, una relación de 9,8:1. El texto es nítido y legible, las firmas están intactas, los bordes de las tablas no muestran roturas y el archivo se imprime correctamente.
6. Recomendaciones de DPI por escenario
El DPI objetivo es la principal palanca que equilibra compresión y legibilidad. La tabla siguiente lista los valores recomendados para los casos de uso comunes.
| Caso de uso | DPI recomendado | Tamaño de imagen por página | Notas |
|---|---|---|---|
| Lectura en pantalla / vista previa web | 150 | 150–300 KB | Texto nítido, carga rápida, bueno para correo |
| Impresión estándar (A4 láser/inyección) | 200–300 | 400–800 KB | Nítido en impresión; 300 para contratos |
| Copia de archivo (alta fidelidad) | 400–600 | 1–3 MB | Preserva el detalle del escaneo para almacenamiento a largo plazo |
| Solo texto blanco y negro | 150–200 | 80–200 KB | Extremadamente pequeño tras escala de grises, bueno para archivo por lotes |
| Documento en color con fotos | 200–300 | 500 KB–1,2 MB | Calidad JPEG 75–85, equilibra color y tamaño |
Una regla práctica: por defecto 150 DPI para pantalla, 300 DPI solo al imprimir, y conserve un maestro de alto DPI separado para archivo. No intente que un único archivo de 600 DPI sirva para todo.
7. Preguntas frecuentes
P1: El archivo comprimido salió más grande que el original. ¿Por qué?
Esto suele ocurrir cuando recomprime un PDF que ya contiene imágenes pequeñas codificadas en JPEG. El remuestreo y la recodificación tienen un coste adicional: si una imagen ya es JPEG a 150 DPI, el «remuestreo» a 150 DPI no la reduce, y el nuevo codificador JPEG puede ser menos eficiente que el original. Añada el coste de metadatos por la reestructuración de flujos de objetos y el archivo puede crecer ligeramente. La solución: inspeccione el DPI y la codificación actuales de cada imagen antes de comprimir, y omita las imágenes que ya cumplen el objetivo (≤150 DPI y JPEG). Procese solo los objetos que realmente superan el umbral.
P2: ¿La compresión degradará la calidad de imagen?
Sí, pero puede mantenerse visualmente imperceptible. La compresión con pérdida proviene principalmente del paso 2 (codificación JPEG). A calidad 72 la diferencia es invisible en pantalla; en impresión puede notar un ligero artifacto en detalles de alta frecuencia como líneas finas o fuentes pequeñas. Si la calidad importa más, suba la calidad JPEG a 85 o cambie al modo sin pérdida JPEG 2000 (/JPXDecode con transformación reversible). El subconjunto de fuentes, la eliminación de redundancia y la linealización son todos sin pérdida y no tienen ningún efecto en la visualización.
P3: ¿Un PDF ya comprimido puede comprimirse de nuevo?
Sí, pero con rendimientos decrecientes. La primera pasada recoge los frutos más accesibles (DPI alto, codificación FlateDecode, fuentes completas). La segunda pasada tiene poco que optimizar. Para juzgarlo: compruebe si las imágenes siguen superando el DPI objetivo, si queda alguna codificación no JPEG y si las fuentes siguen siendo conjuntos completos. Si los tres ya son óptimos, la compresión adicional se basa principalmente en la eliminación de redundancia y la linealización, ahorrando típicamente solo del 5 % al 10 %. No recomprima repetidamente un PDF ya optimizado — cada codificación con pérdida acumula pérdida de calidad.
8. Referencia rápida de parámetros
| Parámetro | Valor recomendado | Notas |
|---|---|---|
| DPI objetivo (pantalla) | 150 | Estándar para contenido de documento |
| DPI objetivo (impresión) | 300 | Mantiene la impresión A4 nítida |
| Calidad JPEG (pantalla) | 70–75 | Tamaño primero, legibilidad suficiente |
| Calidad JPEG (impresión) | 80–90 | Calidad primero, tamaño secundario |
| Modo de color (documento B/N) | DeviceGray | Reduce el tamaño a la mitad frente a color |
| Subconjunto de fuentes | Activado | Obligatorio para fuentes CJK, reducción del 95 %+ |
| Linealización | Activado | Mejora la experiencia de vista previa web |
| Object Stream | Activado | Comprime los metadatos de objetos |
| Limpieza de redundancia | Activado | Especialmente eficaz en archivos editados repetidamente |
Conclusión
La compresión PDF no es un arte oscuro — es un tratamiento dirigido a cada tipo de objeto dentro del archivo. El método de cinco pasos sigue una lógica clara: maneje primero el mayor contribuyente (las imágenes, mediante remuestreo y conversión de formato), luego las fuentes (subconjunto), luego la estructura (eliminación de redundancia y linealización). Ejecute este pipeline en un contrato escaneado típico de 80 MB y llegará de forma fiable a 8–10 MB con la legibilidad y la imprimibilidad completas intactas.
Tres comprobaciones a recordar: para escaneos, mire primero el DPI; para dCompatible con distribuciones Linux habituales (Debian, Ubuntu) – alineado con los requisitos de soberanía digital.ncuentre el coste dominante y la relación de compresión se encargará del resto.
Lecturas relacionadas:
- Principios y métodos de compresión PDF: cómo reducir eficazmente el tamaño de un PDF
- Guía completa de compresión de archivos: principios y métodos de compresión PDF/imagen/vídeo/documento
¿Necesita comprimir archivos? Pruebe SmartSlim
Basado en un motor de compresión Rust de desarrollo propio, soporta más de 40 formatos en 10 categorías como PDF, imágenes, vídeo, Office y OFD. La compresión se realiza localmente y los datos no salen de su dominio.