Vous recevez un PDF de contrat numérisé de 80 Mo. Il est rejeté par les e-mails, refusé par les applications de messagerie, et dépasse les limites d'envoi de chaque système que vous essayez. Cela vous dit quelque chose ? Les fichiers PDF deviennent volumineux pour une raison précise, et les réduire sereinement à un dixième de leur taille n'a rien de magique — il s'agit de comprendre ce qui se trouve à l'intérieur du conteneur et d'appliquer la bonne technique à chaque type de contenu. Cet article dissèque cinq techniques de compression clés issues de la spécification PDF, puis passe en revue un véritable contrat numérisé de 80 Mo jusqu'à obtenir 8,2 Mo.
1. D'où vient la taille d'un PDF
Un PDF est un format conteneur. En interne, il s'agit d'une collection d'objets : un arbre de pages, des dictionnaires de ressources, des flux de contenu, des XObjects d'image, des polices et des métadonnées. L'augmentation de la taille remonte presque toujours à trois catégories.
Images intégrées. C'est le coût dominant dans les documents numérisés. Un scanner réglé par défaut sur 600 DPI produit une image bitmap A4 d'environ 4960×7016 pixels. À une profondeur de couleur de 24 bits, les données brutes d'une seule page représentent environ 100 Mo ; même après la compression sans perte FlateDecode (zlib), chaque page pèse encore de 2 à 5 Mo. Un contrat de 30 pages atteint 60 à 150 Mo.
Polices intégrées. Pour garantir un rendu identique sur tous les appareils, les PDF intègrent des fichiers de police complets. Une police CJK complète (par exemple, une police Source Han) comporte plus de 20 000 glyphes et le fichier TTF seul représente 10 à 20 Mo ; l'OTF peut être plus volumineux. Intégrez plusieurs graisses ou plusieurs familles et cette catégorie augmente rapidement.
Graphismes vectoriels et objets redondants. Les vecteurs eux-mêmes sont petits, mais les exports CAD complexes, les champs de formulaire imbriqués, les ressources des révisions supprimées et les flux de métadonnées dupliqués s'accumulent silencieusement. Le mécanisme de mise à jour incrémentale du PDF est un contrevenant notoire : chaque enregistrement ajoute une nouvelle révision sans supprimer les anciens objets, le fichier grossit donc à chaque modification.
Une fois que vous savez où se trouvent les octets, la solution s'ensuit. La méthode en cinq étapes ci-dessous couvre la grande majorité des scénarios de compression réels.
2. La méthode en cinq étapes en un coup d'œil

Étape 1 : Rééchantillonnage d'image
C'est l'étape la plus efficace pour les documents numérisés. Un scan à 600 DPI est indiscernable d'un scan à 150 DPI sur n'importe quel écran normal, pourtant le nombre de pixels diffère d'un facteur 16 (les DPI sont linéaires ; les pixels sont quadratiques, donc (600/150)² ≈ 16).
La décision clé est le DPI cible. Le contenu de document (contrats, rapports, factures) s'affiche correctement à 150 DPI. Pour l'impression, augmentez-le à 200–300 DPI. Les scans d'archivage haute fidélité peuvent conserver 400 DPI et plus. Pour l'algorithme de rééchantillonnage, Lanczos est le choix recommandé — il préserve mieux la netteté des contours de texte lors de la réduction que l'interpolation bilinéaire et évite l'effet de bloc du plus proche voisin.
Dans l'implémentation, vous lisez les informations /Width, /Height et DPI du XObject d'image à partir de /DecodeParms, vous redimensionnez proportionnellement, puis vous réécrivez. Veillez à mettre à jour /Width, /Height et /Intent ensemble, sinon le rendu sera désaligné.
Étape 2 : Conversion de format d'image
Le PDF marque l'encodage d'image avec le champ /Filter. Les documents numérisés utilisent généralement /FlateDecode (sans perte de type PNG), qui est bien moins efficace que /DCTDecode (JPEG) pour les images réelles comme les photos ou les pages numérisées.
Le même scan A4 qui occupe 4 Mo sous FlateDecode peut descendre à 300–500 Ko en JPEG de qualité 72 — une réduction de 85 % sans différence perceptible à l'écran. Deux choses à surveiller : convertissez les documents noir et blanc en niveaux de gris (/ColorSpace /DeviceGray) avant l'encodage pour diviser la taille par deux, et augmentez la qualité JPEG à 80+ sur les pages contenant des signatures afin que les traits de stylo restent intacts.
/DCTDecode n'est pas la seule option. Pour les graphiques avec de grandes zones de couleur unie, /JPXDecode (JPEG 2000) est plus petit à qualité équivalente, bien que la compatibilité avec les anciens lecteurs soit moins bonne.
Étape 3 : Incorporation partielle de polices
L'incorporation d'une police CJK complète coûte 10 Mo ou plus, mais un contrat de 30 pages peut n'utiliser que 800 à 1 500 caractères distincts. L'incorporation partielle de polices ne conserve que les glyphes qui apparaissent dans le document et supprime tout le reste.
Une police partielle se réduit généralement à 100–300 Ko — une réduction de plus de 95 %. L'approche : parcourez le flux de contenu de chaque page, extrayez les caractères des opérateurs Tj et TJ, résolvez-les via la table /ToUnicode pour obtenir l'ensemble des points de code utilisés, puis utilisez un outil de police (comme fontTools) pour construire un nouveau fichier de police contenant uniquement ces glyphes.
Deux mises en garde : les polices CID nécessitent la gestion de /CIDToGIDMap pour éviter le désalignement des glyphes, et les polices partielles sont conventionnellement renommées avec un préfixe (comme ABCDEF+) pour les marquer comme sous-ensembles, ce qui n'affecte pas l'affichage.
Étape 4 : Supprimer les objets redondants
Après des modifications répétées, des fusions et des enregistrements incrémentaux, les PDF accumulent des objets « orphelins » — des ressources écrasées par des révisions plus récentes mais jamais supprimées de la table de références croisées. Coupables typiques : anciennes images plus référencées par aucune page, copies de polices remplacées, dictionnaires de ressources vides et flux de métadonnées dupliqués.
La logique de nettoyage : partez du catalogue du document (/Root), faites un parcours en profondeur de l'arbre de pages et de la chaîne de références de ressources, marquez chaque objet accessible, puis reconstruisez la table de références croisées et supprimez les objets inaccessibles. Cette étape est particulièrement efficace sur les documents modifiés de nombreuses fois : un seul passage supprime généralement 5 % à 15 % de la taille, et dans les cas extrêmes de mises à jour incrémentales accumulées, plus de 30 %.
Étape 5 : Linéarisation
La linéarisation ne réduit pas le nombre total d'octets, mais elle réorganise la structure du fichier pour activer l'affichage Web rapide (Fast Web View). Un PDF linéarisé place les objets nécessaires à la première page en tête de fichier et insère des tables d'indices, afin qu'un lecteur puisse afficher la première page avant la fin du téléchargement.
Bien que la linéarisation ne réduise pas directement la taille du fichier, c'est l'étape de clôture naturelle d'un pipeline de compression. Associée à la compression des flux d'objets et des flux de références croisées, la restructuration globale produit encore une petite baisse de taille (1 % à 3 %). Plus important encore, les PDF linéarisés offrent des performances nettement meilleures dans les scénarios d'intégration Web et de prévisualisation cloud.
3. Comparaison avant/après
Voici comment le contrat de 80 Mo évolue après chaque étape :
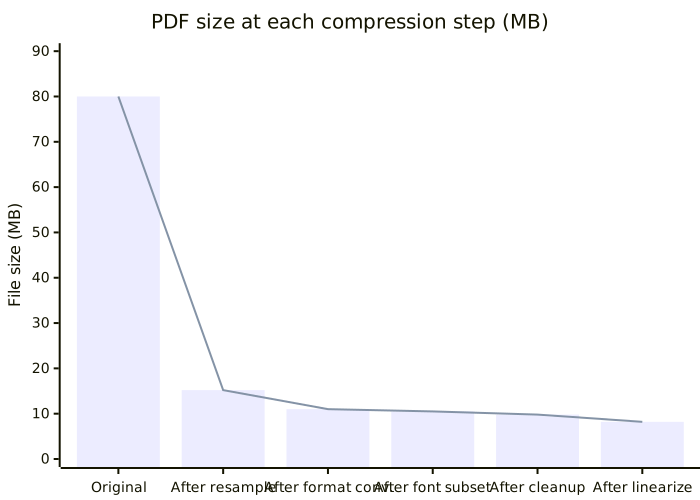
L'étape 1 (rééchantillonnage) offre la plus forte baisse, passant de 80 Mo à 15,2 Mo. L'étape 2 (conversion de format) supprime 4 Mo supplémentaires. Les trois étapes restantes retirent environ 7 Mo au total. Le ratio de compression global est d'environ 9,8:1.
4. Pseudocode Python
Le pseudocode ci-dessous présente la logique complète en cinq étapes. En production, vous combinerez des bibliothèques telles que pikepdf, PyMuPDF et reportlab.
import io
from PIL import Image

def compress_pdf(input_path, output_path,
                 target_dpi=150, jpeg_quality=72, grayscale=True):
    """
    Point d'entrée de la compression PDF en cinq étapes.
    :param input_path: chemin du PDF d'entrée
    :param output_path: chemin du PDF de sortie
    :param target_dpi: DPI cible (150 par défaut, adapté à l'écran)
    :param jpeg_quality: qualité JPEG (72 par défaut)
    :param grayscale: convertir en niveaux de gris (recommandé pour documents N/B)
    :return: (taille_originale, taille_compressée)
    """
    pdf = open_pdf(input_path)
    original_size = file_size(input_path)

    # Étape 1 : rééchantillonnage d'image (600 DPI -> DPI cible)
    for page in pdf.pages:
        for image in page.images:
            resampled = resample_image(image, target_dpi)
            image.replace(resampled)

    # Étape 2 : conversion de format (FlateDecode -> DCTDecode/JPEG)
    for page in pdf.pages:
        for image in page.images:
            if image.filter == "FlateDecode":
                jpeg_data = encode_jpeg(image, jpeg_quality, grayscale)
                image.replace(jpeg_data, filter="DCTDecode")

    # Étape 3 : incorporation partielle de polices (conserver uniquement les glyphes utilisés)
    used_chars = collect_used_chars(pdf)
    for font in pdf.fonts:
        subset = build_subset(font, used_chars)
        font.replace(subset)

    # Étape 4 : supprimer les objets redondants
    pdf.remove_unreferenced_resources()
    pdf.compact_xref()  # reconstruire la table de références croisées

    # Étape 5 : linéarisation (Fast Web View)
    pdf.save(output_path, linearize=True,
             object_streams=True, compress_streams=True)
    pdf.close()

    compressed_size = file_size(output_path)
    return original_size, compressed_size


def resample_image(image, target_dpi):
    """Rééchantillonner une image au DPI cible."""
    src_dpi = image.dpi
    if src_dpi <= target_dpi:
        return image  # ne jamais agrandir, ignorer
    scale = target_dpi / src_dpi
    new_w = int(image.width * scale)
    new_h = int(image.height * scale)
    pil_img = Image.open(io.BytesIO(image.data))
    return pil_img.resize((new_w, new_h), Image.LANCZOS)


def encode_jpeg(image, quality, grayscale):
    """Convertir en niveaux de gris et encoder en JPEG."""
    pil_img = Image.open(io.BytesIO(image.data))
    if grayscale and pil_img.mode != "L":
        pil_img = pil_img.convert("L")  # conversion en niveaux de gris
    buf = io.BytesIO()
    pil_img.save(buf, format="JPEG", quality=quality, optimize=True)
    return buf.getvalue()


def collect_used_chars(pdf):
    """Parcourir les flux de contenu pour collecter chaque point de code réellement utilisé."""
    used = set()
    for page in pdf.pages:
        for text_op in page.content_stream.text_ops:
            used.update(extract_codepoints(text_op))
    return used


def build_subset(font, used_chars):
    """Construire une police partielle contenant uniquement les glyphes utilisés."""
    subset = font.subset(glyphs=used_chars)
    subset.name = prefix + "+" + font.name  # convention de nommage des sous-ensembles
    return subset
Il s'agit de pseudocode — la gestion des erreurs, le mappage des polices CID et la reconstruction de ToUnicode sont omis — mais la structure est claire : rééchantillonner, convertir, sous-ensemble, nettoyer, linéariser, dans cet ordre.
5. Étude de cas : contrat numérisé de 80 Mo réduit à 8,2 Mo
Le document source est un véritable contrat chinois de 32 pages numérisé à 600 DPI, taille originale 80,4 Mo.
Profil du document :
- 32 pages, A4, scan noir et blanc à 600 DPI
- 32 images intégrées, toutes en FlateDecode, moyenne de 2,4 Mo par page
- 2 polices intégrées (Source Han Serif Regular + Bold), 28 Mo combinés
- Enregistré de manière incrémentale 3 fois, avec des objets redondants présents
Étapes et paramètres :
| Étape | Opération | Paramètres clés | Taille |
|---|---|---|---|
| 1 | Rééchantillonnage d'image | 600 DPI → 150 DPI, Lanczos | 80,4 → 15,2 Mo |
| 2 | Conversion de format | FlateDecode → JPEG, qualité 72, niveaux de gris | 15,2 → 11,0 Mo |
| 3 | Incorporation partielle de polices | conserver 1 287 glyphes utilisés | 11,0 → 10,5 Mo |
| 4 | Suppression des redondances | reconstruire la table de références croisées | 10,5 → 9,8 Mo |
| 5 | Linéarisation | Object Stream + Fast Web View | 9,8 → 8,2 Mo |
Résultat : 8,2 Mo, un ratio de 9,8:1. Le texte est net et lisible, les signatures sont intactes, les bordures des tableaux ne présentent aucune rupture, et le fichier s'imprime correctement.
6. Recommandations DPI par scénario
Le DPI cible est le principal levier équilibrant compression et lisibilité. Le tableau ci-dessous liste les valeurs recommandées pour les cas d'usage courants.
| Cas d'usage | DPI recommandé | Taille d'image par page | Remarques |
|---|---|---|---|
| Lecture à l'écran / prévisualisation Web | 150 | 150–300 Ko | Texte net, chargement rapide, adapté à l'e-mail |
| Impression standard (A4 laser/encre) | 200–300 | 400–800 Ko | Net en impression ; 300 pour les contrats |
| Sauvegarde d'archivage (haute fidélité) | 400–600 | 1–3 Mo | Préserve les détails du scan pour un stockage long terme |
| Noir et blanc texte uniquement | 150–200 | 80–200 Ko | Extrêmement petit après niveaux de gris, adapté à l'archivage par lot |
| Document couleur avec photos | 200–300 | 500 Ko–1,2 Mo | Qualité JPEG 75–85, équilibre couleur et taille |
Une règle pratique : par défaut 150 DPI pour l'écran, 300 DPI uniquement pour l'impression, et conservez un master haute résolution séparé pour l'archivage. N'essayez pas de faire servir un seul fichier 600 DPI à tous les usages.
7. FAQ
Q1 : Le fichier compressé est plus volumineux que l'original. Pourquoi ?
Cela se produit généralement lorsque vous recomprimez un PDF contenant déjà de petites images encodées en JPEG. Le rééchantillonnage et le réencodage ont un surcoût : si une image est déjà en JPEG 150 DPI, le « rééchantillonnage » à 150 DPI ne la réduit pas, et le nouvel encodeur JPEG peut être moins efficace que l'original. Ajoutez le surcoût des métadonnées lié à la restructuration des flux d'objets et le fichier peut légèrement grossir. La solution : inspectez le DPI et l'encodage actuels de chaque image avant la compression, et ignorez les images qui atteignent déjà la cible (≤150 DPI et JPEG). Traitez uniquement les objets qui dépassent réellement le seuil.
Q2 : La compression dégrade-t-elle la qualité d'image ?
Oui, mais elle peut être maintenue visuellement imperceptible. La compression avec perte provient principalement de l'étape 2 (encodage JPEG). À une qualité 72, la différence est invisible à l'écran ; à l'impression, vous pouvez observer un léger halage sur les détails haute fréquence tels que les lignes fines ou les petites polices. Si la qualité prime, augmentez la qualité JPEG à 85 ou passez en mode JPEG 2000 sans perte (/JPXDecode avec transformation réversible). L'incorporation partielle de polices, la suppression des redondances et la linéarisation sont toutes sans perte et n'ont aucun effet sur l'affichage.
Q3 : Un PDF déjà compressé peut-il être compressé à nouveau ?
Oui, mais avec des rendements décroissants. Le premier passage récolte les fruits les plus accessibles (DPI élevé, encodage FlateDecode, polices complètes). Le second passage a peu de choses à optimiser. Pour juger : vérifiez si les images dépassent encore le DPI cible, s'il reste un encodage non-JPEG, et si les polices sont encore des ensembles complets. Si les trois sont déjà optimaux, la compression supplémentaire repose principalement sur la suppression des redondances et la linéarisation, économisant généralement seulement 5 % à 10 %. Ne recomprimez pas répétitivement un PDF déjà optimisé — chaque encodage avec perte accumule une perte de qualité.
8. Référence rapide des paramètres
| Paramètre | Valeur recommandée | Remarques |
|---|---|---|
| DPI cible (écran) | 150 | Standard pour le contenu de document |
| DPI cible (impression) | 300 | Garde l'impression A4 nette |
| Qualité JPEG (écran) | 70–75 | Taille d'abord, lisibilité suffisante |
| Qualité JPEG (impression) | 80–90 | Qualité d'abord, taille secondaire |
| Mode couleur (document N/B) | DeviceGray | Divise la taille par deux vs couleur |
| Incorporation partielle de polices | Activé | Obligatoire pour les polices CJK, réduction de 95 %+ |
| Linéarisation | Activé | Améliore l'expérience de prévisualisation Web |
| Object Stream | Activé | Compresse les métadonnées d'objet |
| Nettoyage des redondances | Activé | Particulièrement efficace sur les fichiers modifiés à plusieurs reprises |
Conclusion
La compression PDF n'est pas un art obscur — c'est un traitement ciblé pour chaque type d'objet à l'intérieur du fichier. La méthode en cinq étapes suit une logique claire : traitez d'abord le contributeur le plus important (les images, via le rééchantillonnage et la conversion de format), puis les polices (incorporation partielle), puis la structure (suppression des redondances et linéarisation). Appliquez ce pipeline à un contrat numérisé typique de 80 Mo et vous obtiendrez fiablement 8 à 10 Mo avec une lisibilité et une imprimabilité complètes préservées.
Trois vérifications à retenir : pour les scans, regardez d'abord le DPI ; pour les documents, vérifiez si les polices sont des ensembles complets ; pour les anciens fichiers, inspectez les objets redondants. Trouvez le coût dominant, et le ratio de compression se fera tout seul.
Lectures associées :
- Principes et méthodes de compression PDF : comment réduire efficacement la taille d'un PDF
- Guide complet de la compression de fichiers : principes et méthodes de compression PDF/image/vidéo/document
Besoin de compresser des fichiers ? Essayez SmartSlim
Basé sur un moteur de compression Rust développé en interne, prenant en charge 10 catégories et plus de 40 formats dont PDF, images, vidéo, Office et OFD, avec une compression locale qui conserve vos données sur place.